
How to Assemble Gaming Chair
Gaming chairs have become popular recently as people have begun to appreciate the importance of comfort while gaming. Many gamers find themselves sitting in uncomfortable positions for hours at a time, which can lead to health problems in the long run. As a result, many people are now investing in gaming chairs to ensure they’re the most comfortable experience possible.
It can be intimidating to start the assembly process of your chair, but don’t worry, we are going to try our best to walk you through assembling your new gaming chair. This process can also be applied to either a gaming or office chair.
Unpack All Of The Materials
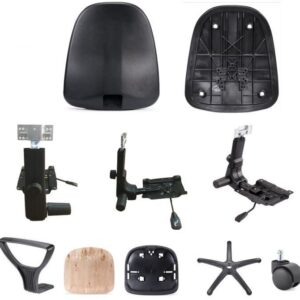
The first step is carefully opening the package and arranging all supplies. This is the easiest approach to ensure that you construct a gaming chair correctly and without leaving any parts out.
Get the instruction booklet to have that you have all of the necessary supplies to begin building. If any parts are missing, please contact the manufacturer or return the gaming chair for a replacement.
Read the Instruction Manual Thoroughly
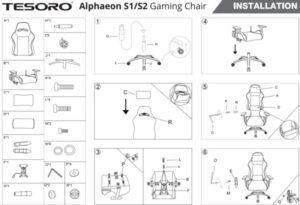
Gaming chairs can be expensive, and it is important to know how they work before starting assembly. Assembly instructions will usually come with your new gaming seat with the instruction manual, but if not, you should find them online on their web manufacturer’s other sources; the manufacturer’s web portal page usually has a PDF of an instruction manual, where documentation about cleaning procedures is listed as well ( separately).
Assembling a chair without looking into these details could lead one down some unproductive paths so make sure that everything is done correctly by reading over what’s written carefully!
Organise The Pieces of Your Chair and Tools
Once you’ve assigned all of the gaming chair parts and removed it’s of the plastic coverings, it’s essential to organise the various elements of the chair so you can find them later. In most circumstances, you first need to acquire the underside of the seat that you need to concentrate on setting up.
Modern gaming chairs are often designed so that the user does not require special equipment to finish the construction procedure. In most circumstances, an Allen wrench, a screwdriver, and a wrench are all required. Some chairs may be fully built with an Allen wrench; many come with this tool as standard. Before beginning the assembly, gather the various screws and related components and organise them.
Connect Your Seat’s Underside To The Main Chair Mechanism
The four provided screw head bolts fasten the seat to the primary chair mechanism by connecting the underside. Make careful to fasten the chair when doing so firmly. After all, this link must be as strong as possible while supporting practically all your weight.
Slide the chair back onto the mechanism after doing that. Hold the chair upside-down to do this.
Make Use Of The Bolts In Your Kit To Bolt Everything Together
This is the time to show off your open-end wrench. As instructed in the instruction booklet, bolt everything together using the bolts included in your kit. After that, insert the armrests into the holes on the underside of the chair.
Connect the Casters to the chair’s 5-Star Base

In this step, you must connect the casters to the 5-star base of your gaming or office chair. In certain circumstances, a lot of force is required to properly get the casters to pop over the plastic socket bracers.
When you hear a “click,” you’ll know everything is in place.
Connect The Gas Strut To The Chair
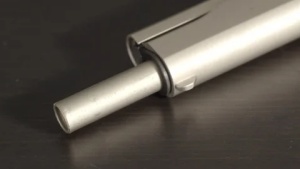
Now is the time to cover the gas strut with the gas strut cover. As soon as you’ve done so, attach the gas strut to the chair’s 5-star base and link the chair mechanism to the gas strut on the 5-star base.
Attach the Headrest and Backrest

This step only applies to gaming or office chairs with separate headrest or backrest attachments.
The attachments must be fastened to the chair’s components in these circumstances. After that, you should test how the backrest or headrest attachments function and if they are correctly placed.
Test the Chair
After this part, you are already done with the assembly process; however, you wouldn’t be sure of how successful the assembly process has been unless you try sitting down on the chair to make sure it doesn’t fall apart.
Tip: Watch Videos!!
There are a lot of tutorial videos about almost every model of gaming chair out there! If you are having a hard time, then you can always check and go online for help, mostly on Youtube and some manufacturers have their own videos available.
Conclusion
Chair assembly can be a daunting task, but following the manufacturer’s instructions carefully will help you avoid any problems. Make sure to organise all of the parts and tools before beginning, and use the included bolts to connect everything together. If something doesn’t seem right, check for video tutorials online before giving up. With a little patience, you’ll have your new gaming chair assembled in no time!
Last Updated on
- Exhaust fan vs Ventilation Fan - September 20, 2022
- Can a Standing Fan Work Without Capacitor - September 16, 2022
- Table Fan vs Stand Fan - September 13, 2022